Customer scenario
Many businesses need to securely verify the identity of customers over the phone. For example, banks or credit unions may require customers to input their account numbers over the phone for authentication purposes before accessing account information or performing transactions.
Opportunity
Once you’ve identified the caller, your agents can respond quickly and effectively and the caller benefits from knowing that their information is secure.
Solution
- Ask the caller to enter their account number using the telephone keypad.
- The system will automatically look up the verification info in your database.
- The call interface will display caller details, such as their name. You can also customise the interface to give your agents a direct link to the caller’s profile in your database.
Click on the tabs below to get a step by step guide on how to Verify customer identity via HTTP Request:
Get started
Prerequisites
- Advanced Nodes activated.
Create a new IVR or use an existing one
- If this is your first IVR, please refer to the support page for info on how to set up an IVR with standard nodes: How to set up your PBX services.
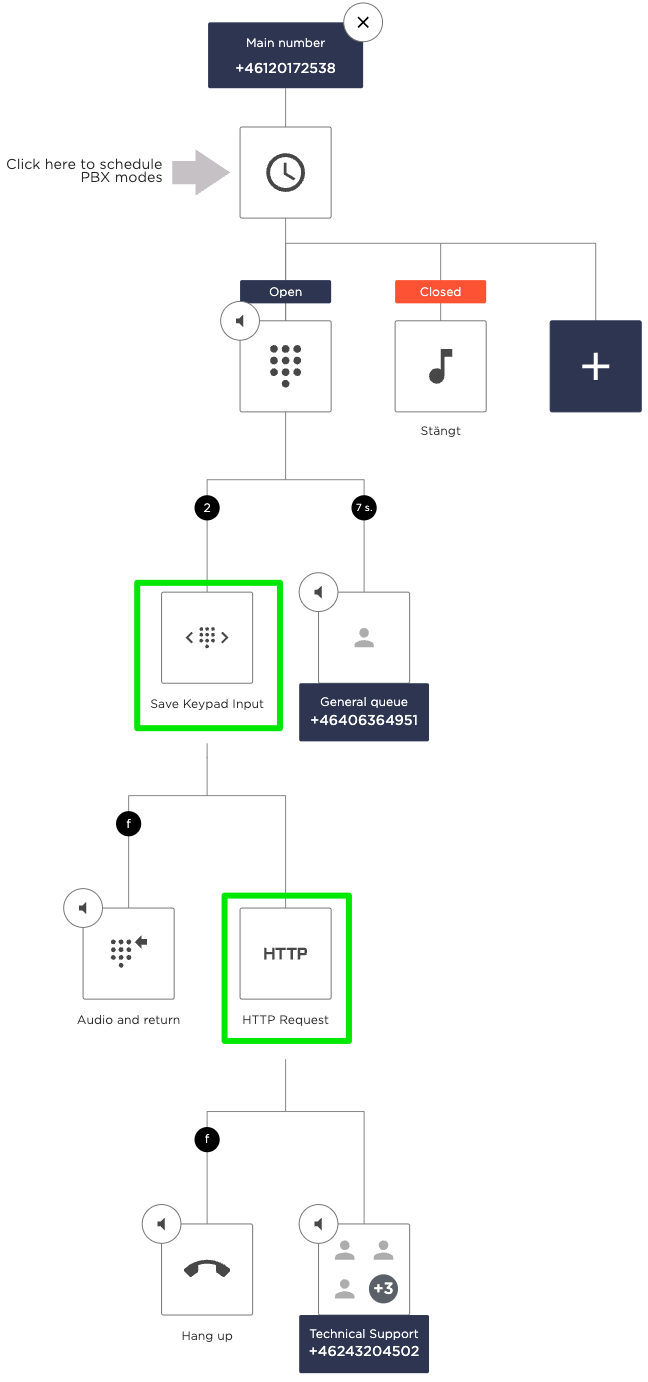
- The image to the right is an example of a complete IVR setup that caters to this use case. Use this as a reference to create your own IVR flow in the admin portal.
- The following steps will go through the setup of the Advanced nodes marked with green in the IVR flow, as well as the process of adding a Call Widget.
Ask for the account number
Add Save Keypad Input node
Choose an empty box in your IVR and click Advanced > Save keypad input to add the node.
This node will prompt the caller to enter their account number and save it in a variable.
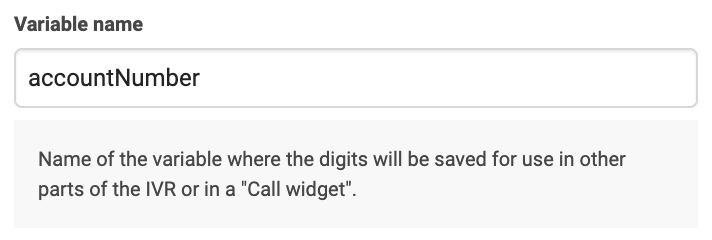
Variable name
Name of the variable where the digits will be saved, in this case we will call it accountNumber.
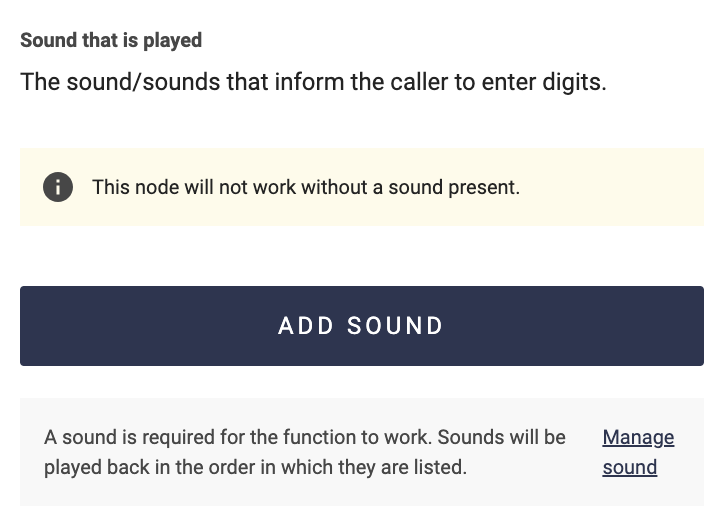
The sound that is played
Choose a sound to play for the caller. It could be something along the lines of: "Enter your account number, 10 digits, and end with pound(#)". Since you record this sound yourselves you can customise it however you like!
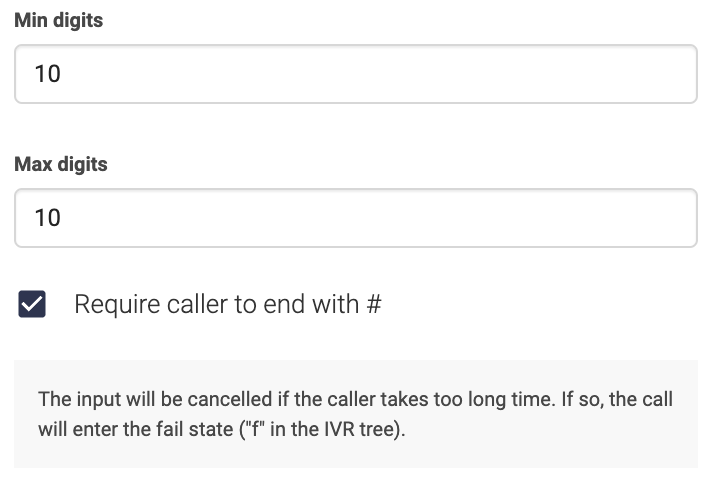
Minimum and maximum digits
Lastly you need to choose Min and Max digits. In this example both are set to 10 digits. We recommend to keep "Require caller to end with #" checked.
Verify account number in your database
Add HTTP Request node
Choose an empty box in your IVR and click Advanced > HTTP-request to add the node.
In this node we will check if the customer’s account number exists in your customer database and collect information about the customer to display for the agent.
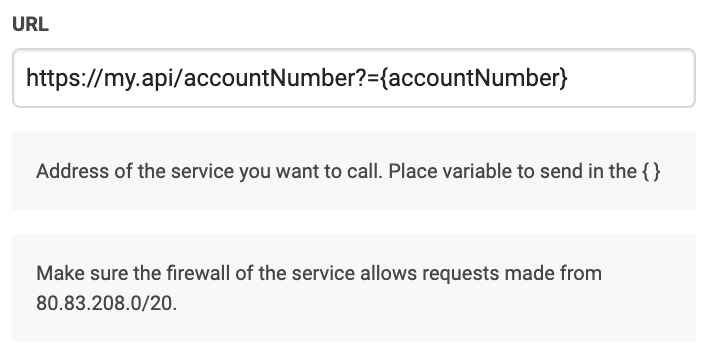
URL
Enter the URL address to the HTTP request that will be sent to your system, including the saved variable: accountNumber.
Keep in mind that the request is sent from the Telavox network, which means that the system needs to allow requests made from the network 80.83.208.0/20.
What is an HTTP request?
HTTP works as a request-response protocol between a client and a system. What information you can receive from the system and how to reach it is specified in its API.
This example requires an API point which can accept a request containing an account number and send back a response of personal information about that customer. The system that the request is sent to could be your own, or the API of a supplier that you use.
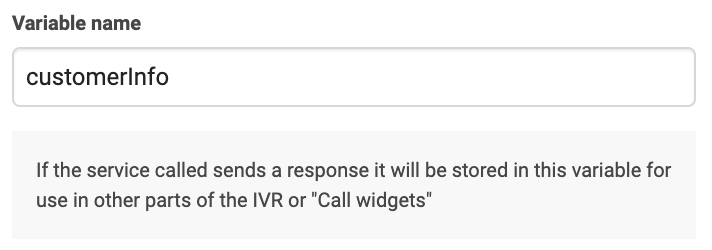
Variable name
Choose what you would like to call the response from the HTTP request, in this example customerInfo.
The variable that is saved here will be accessed later in a Call Widget. A Call Widget can display information about a call to the agent answering it.
What will my response be?
The response can differ depending on the design of your API. In this example, the response is a JSON object which looks like this:
{
“customer”: {
“name”: “Jane Doe”,
“phoneNumber”: “+46706170786”,
“accountNumber”: “1234567890”,
}
}
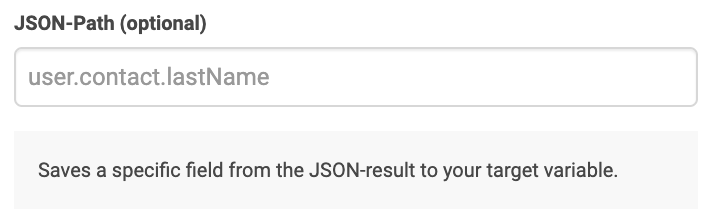
JSON-Path
Choose this based on what format the response from the API will be in.
Since we will use several parts of information from this JSON object, we will save the whole object here, and specify the paths later when creating a Call Widget instead. So in this example the JSON-Path should be left empty.
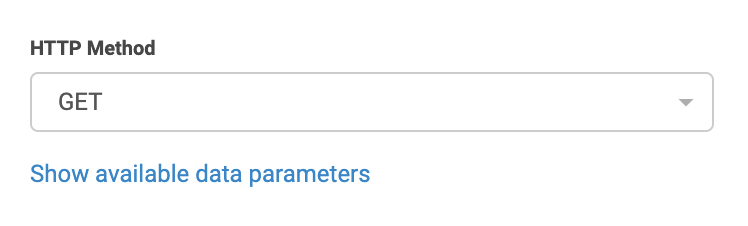
HTTP Method
Specify which method the API endpoint uses, either GET or POST.
In this example, we use GET since that is the standard method for a request that shows information from the system database without altering it.
When do I use POST?
In most cases POST is used when the API request is not for displaying information, but instead updating the system database. E.g. an API request to add the calling number to a list in the database.
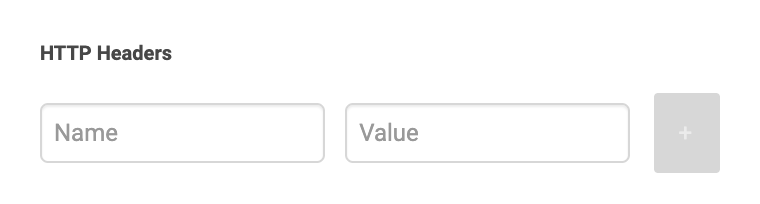
HTTP Headers
Here you get the option to input headers into the request if they are required by your system. This could be for authentication purposes for example. Another way to authenticate without using headers is to make sure the firewall of your service allows requests made from 80.83.208.0/20.
Once you have entered a Name and a Value, click the button to add this header to the request. You can add several headers.
Are there any limitations on what I can send in a header?
It’s not possible to send nested objects/JSON; there is only one plain text name and value per header.
We do not support OAuth which is an authentication method used in e.g. Microsoft Dynamics. It requires a token being sent back and forward which is not possible in Advanced Nodes.
Display information for an agent
Add a new Call Widget
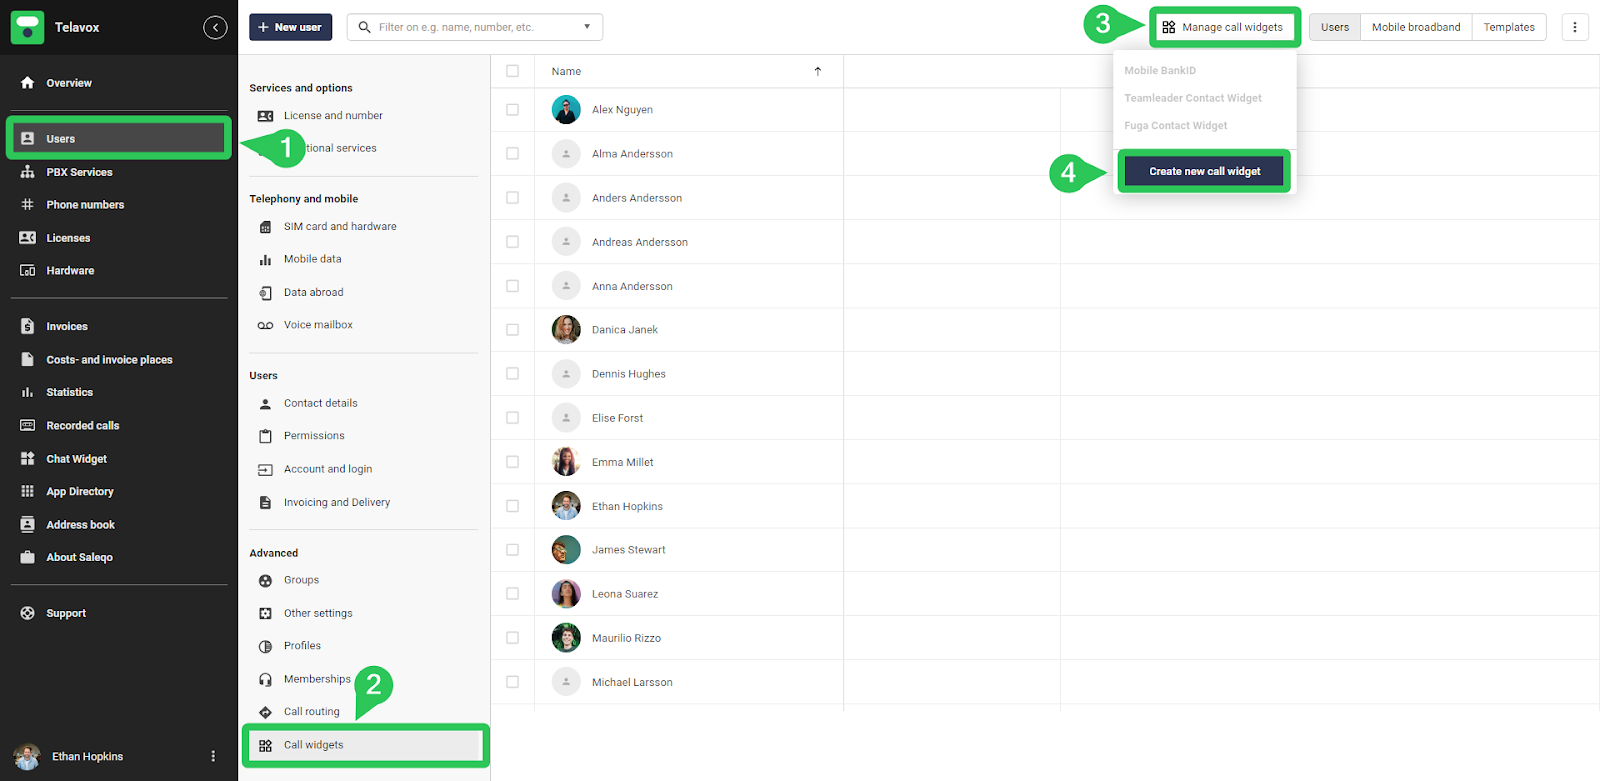
Call widgets can be managed directly in the admin portal under Users > Call Widgets > Manage call widgets.
The greyed-out Call Widgets displayed here cannot be changed. They are usually added automatically by integrations that are installed in the App Directory. For example, the BankID Integration or a Contact Lookup integration.
To create a call widget you press Manage call widgets at the top of the page and then Create new call widget. (shown in the image above). When creating a call widget you will be presented with something we call the Widget Builder, where you can create a customised call widget that fits your needs.
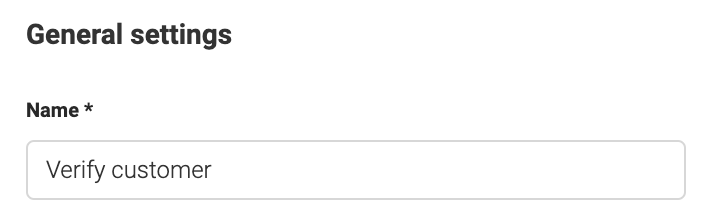
Name
The first thing you will get to enter is a Name for your call widget, this is only used to keep the call widgets organised and the name is not displayed on the call widget itself.
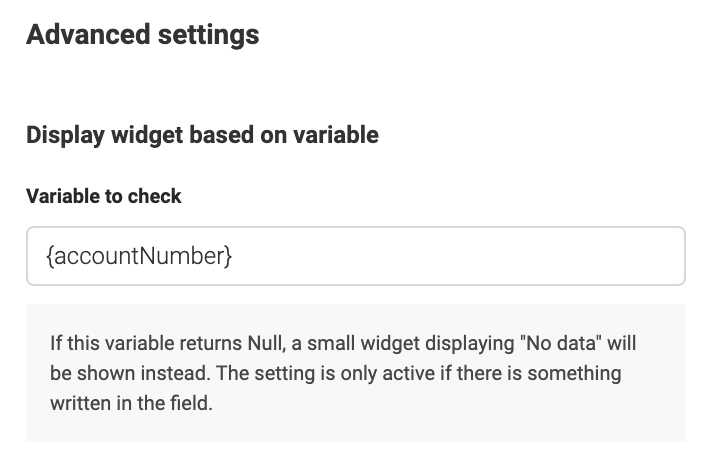
Display widget based on variable
Under the next tab, Advanced settings, you can choose if you want the call widget to automatically be hidden if a certain variable has no value.
In this example we have required callers to input their account number, which was saved in the variable accountNumber. By adding that variable here, you can make sure the agent answering the call does not need to see the call widget if the customer hasn't entered their account number.
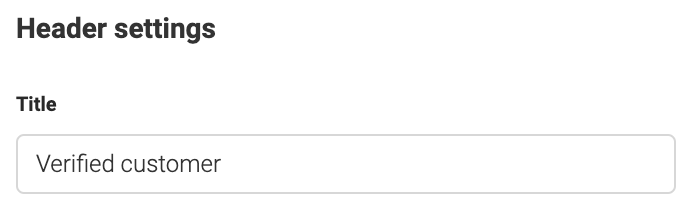
Title
Next, you have Header settings, which is the base of the widget. Choose a title to be displayed on the widget.
Action label
The Action label will also be displayed and used to explain a possible action for the agent to perform. In this case the agent will be able to click to open the customer’s file in your internal system.

Action URL
This is where you add the URL which can perform the action mentioned above. So in this case a link to the customer’s account in the internal system. The URL can either be static or dynamic as in this case, which means that it includes a variable.

Which variables can be used in the URL?
You can use variables that you have created yourself in your PBX with Advanced Nodes, as mentioned previously for example an account number that the customer has entered in the PBX (using Save Keypad Input) or information fetched from a 3rd party system (using HTTP Request). These variables are to be added in the link with curly brackets {variable} or per cent signs %variable%.
Here are some variables that can be used by default in call widgets:
Mixed format:
{NUMBER} is replaced by the caller's phone number.
{B-NUMBER} is replaced by the phone number that was called.
{C-NUMBER} is replaced by the queue number or the telephone number the call was redirected from.
The variables above are phone numbers, where the format of the number is dependent on the user using them. So if I am a Swedish user and receive a call from a Swedish number, then the number will be formatted in the local format (without +46), and if I receive a call from a Norwegian number, then it will be formatted in E.164 format (e.g. +47xx).
Then, we have the variables below, which will always be formatted with E.164 format.
Always E.164 format (+46xx):
{caller} is replaced by the caller's phone number.
{callee} is replaced by the phone number that was called.
{from} is replaced by the queue number or the telephone number the call was redirected from.
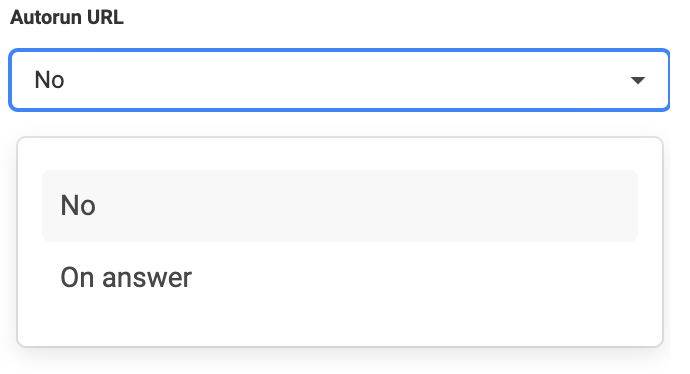
Autorun URL
The dropdown for Autorun URL is used to choose if you want the URL to be opened automatically when a call is answered. If you don't, then you can always still press on the header of the call widget to open the URL.
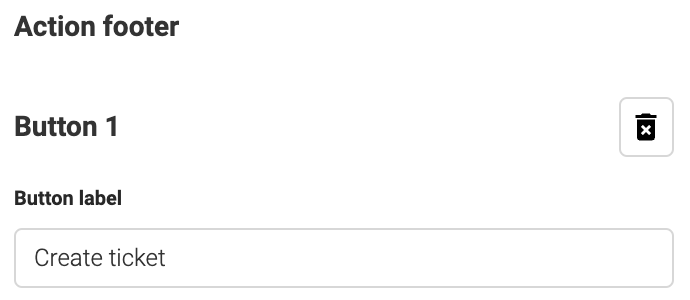
Button label
In the Action footer settings, you can choose to add up to 3 buttons. The button label is what will be displayed, and in this example, we will create a button called “Create ticket”.
Button URL
Add the URL which should be run when the button is pressed. You can use variables in these URLs as well.

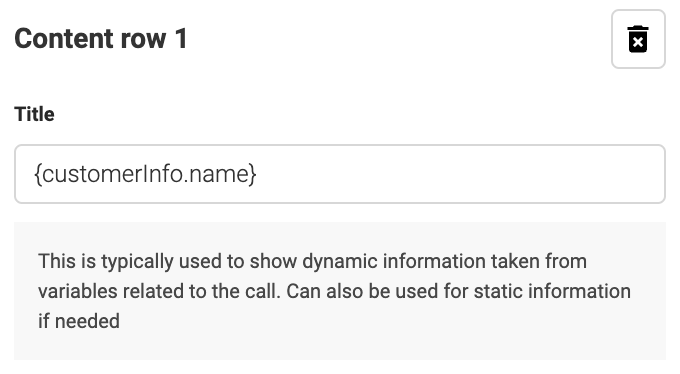
Title
Lastly, you have Content rows, which you can add if you press "+ Add content row". You can add up to 5 content rows. These are used to display dynamic information taken from variables related to the call. But it is also possible to use them for static information if needed.
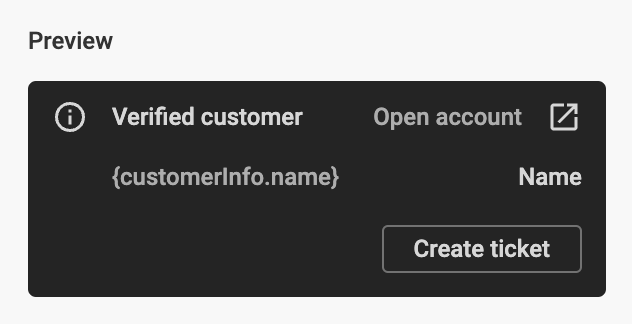
Here, we will add the name of the customer for the agent to see. This can be found nested inside the variable customerInfo, which was the response from the HTTP request node.
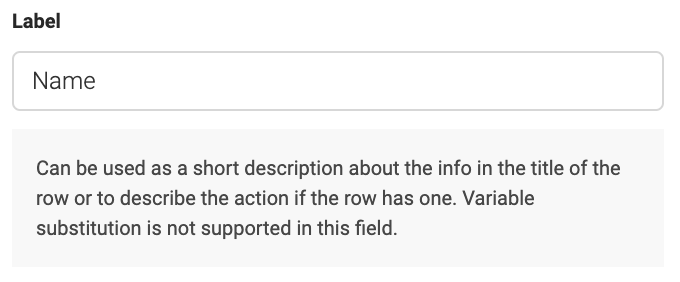
Label
You can add a label to the content row to make it clear what the row is displaying.
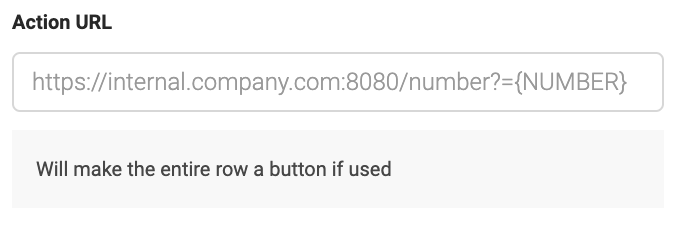
Action URL
Here is also the option to add another Action URL so that the row is clickable as a button and the URL is opened. This won’t be used in our example.
As you can see in the preview, the widget should now look something like this: